Tips & Tricks
The SuperSaaS support documentation covers most topics for setting up your online booking calendar. This section focuses on a few specialized features to help you improve your workflow. The tips and tricks outlined here can provide valuable additions to your online appointment schedule:
- Creating custom drop-down menus that can be included in the booking details
- Working with repeated bookings to increase efficiency
- Using a supervisor field to store additional information
- Using URL extensions to enable several hidden options
- Inserting auto-text to customize email confirmations and display messages
- Connecting to other websites using Zapier or Make
- Sending an email to every user registered in a class
Creating custom drop-down menus that can be included in the booking details
The customizable booking fields on the Process tab via Configure can be used to create drop-down menus in order to present the user with multiple options during the booking process. You can also use the drop-down menu to offer optional services or extras with a price. This can be used in combination with the pricing rules. If you would like to create more than two drop-down menus, you can generate a custom form that can be integrated into the booking process.
Setting up a basic drop-down menu
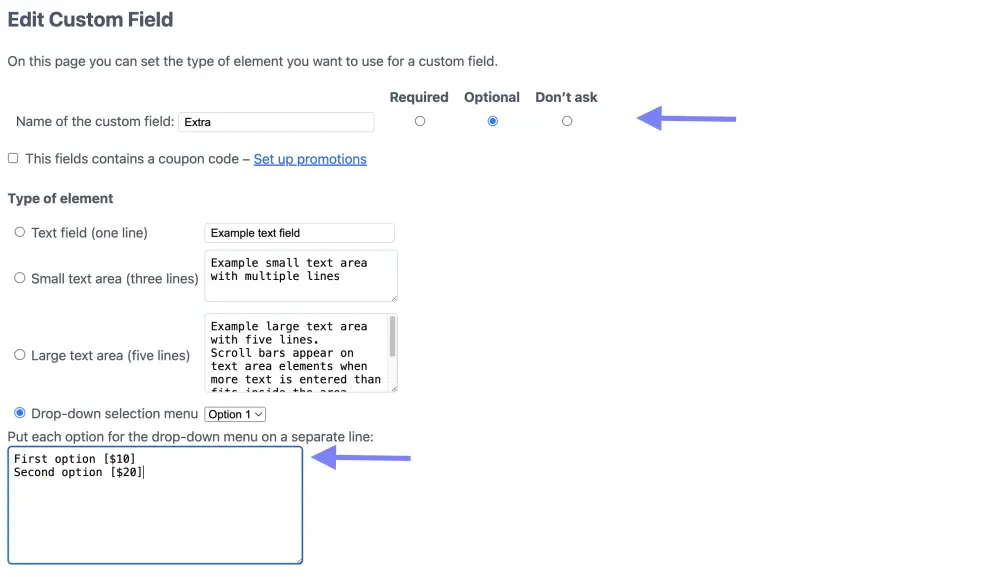
- Via Configure, click on the Process tab. The bottom two additional booking fields can be used to create drop-down menus. Click on “Customize”.
- After naming the drop-down field, you can determine whether this option is either required or optional for the user to select. Next, insert the choices that you would like to present to the user. Here, you also have the option to offer an additional price to the drop-down options in order for the choice to be taken into account by the pricing rules. For example, the system can be configured to automatically calculate a discount that occurs on Mondays. Save your changes.
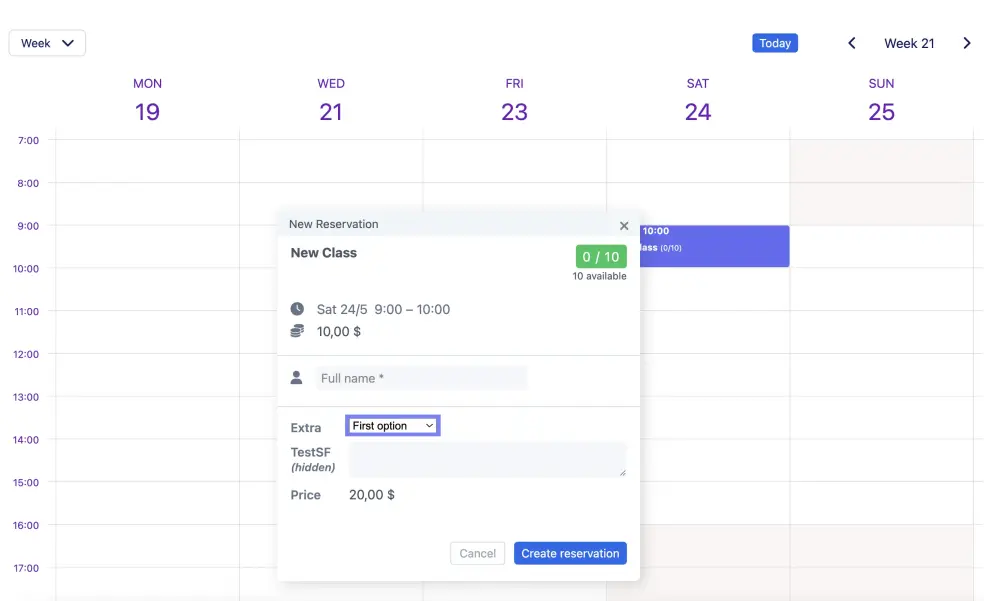
- When a new booking is created, the drop-down box will appear in the new booking window.

Adding a price to the drop-down options
It is important to make sure that you have included the price for each drop-down option that you have added to your online appointment schedule.
To add a price to a drop-down option you simply include the price in the option text. For example: Extra sauna time +$10.
See Advanced pricing for more details on specifying price.
Resource Schedule
- Navigate to the Configure > Resources tab. Select the option price “Depends on date, length or resource”. Click on “Save changes”.
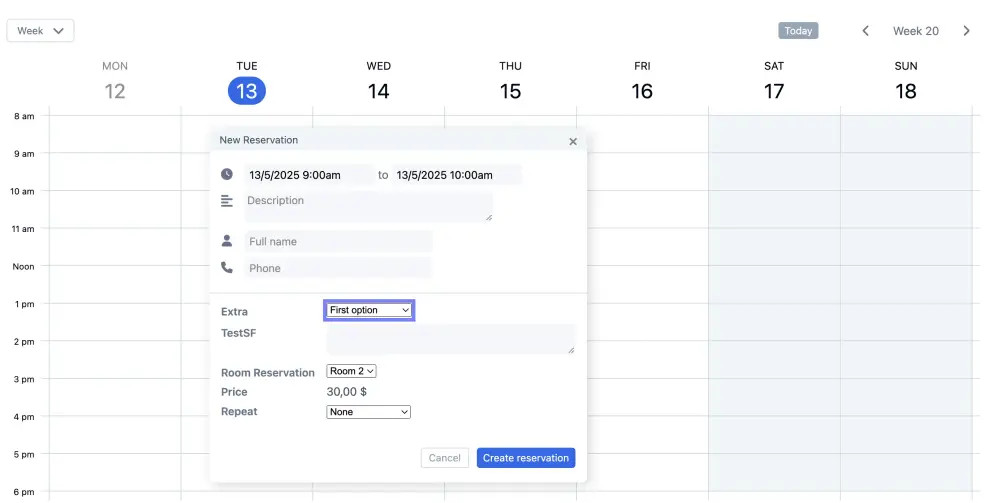
- Click on “Set up pricing”. By default, the pricing rules are set to a certain base price per reservation. This allows you to pick the option “Add field to price”, which simply adds the prices you’ve specified for each drop-down option to the base price of the reservation. Click on “Save changes”.
- Test the different drop-down options to ensure that the prices are calculated as intended.
- If you are using a system with flexible appointment durations, you will likely want to work with a per-hour price versus a per-reservation charge. If you don’t want the extra price for a drop-down option to apply to each hour of the reservation, you can select the option “Add field to total” instead. Click on “Save changes”.
- You can test this option by changing the duration of the booking in combination with the drop-down choices.
- When a new booking is entered into the appointment schedule and a drop-down option is selected, the price will be updated accordingly.


Capacity schedule
- Navigate to the Configure > Resources tab. Select the option in the section Price “Add a price field to the ‘create new slot’ dialog”. Click on “Save changes”.
- Click on “Set up pricing”. By default, the pricing rules are set to a certain base price per reservation. This allows you to pick the option “Add field to price”, which simply adds the prices you’ve specified for each drop-down option to the base price of the reservation. Click on “Save changes”.
- Test the different drop-down options to ensure that the prices are calculated as intended.
- If you are using a system with flexible appointment durations, you will likely want to work with a per-hour price versus a per-reservation charge. If you don’t want the extra price for a drop-down option to apply to each hour of the reservation, you can select the option “Add field to total” instead. Click on “Save changes”.
- You can test this option by changing the duration of the booking in combination with the drop-down choices.
- When a new booking is entered into the appointment schedule and a drop-down option is selected, the price will be updated accordingly.


Service Schedule
- Navigate to the Configure > Services tab. Click on “Set up pricing” to enable pricing rules.
- By default, the pricing rules are set to a certain base price per reservation. This allows you to pick the option “Add field to price”, which simply adds the prices you’ve specified for each drop-down option to the base price of the reservation. Click on “Save changes”.
- Test the different drop-down options to ensure that the prices are calculated as intended.
- If you are using a system with flexible appointment durations, you will likely want to work with a per-hour price versus a per-reservation charge. If you don’t want the extra price for a drop-down option to apply to each hour of the reservation, you can select the option “Add field to total” instead. Click on “Save changes”.
- You can test this option by changing the duration of the booking in combination with the drop-down choices.
- When a new booking is entered into the appointment schedule and a drop-down option is selected, the price will be updated accordingly.


Working with repeated bookings to increase efficiency
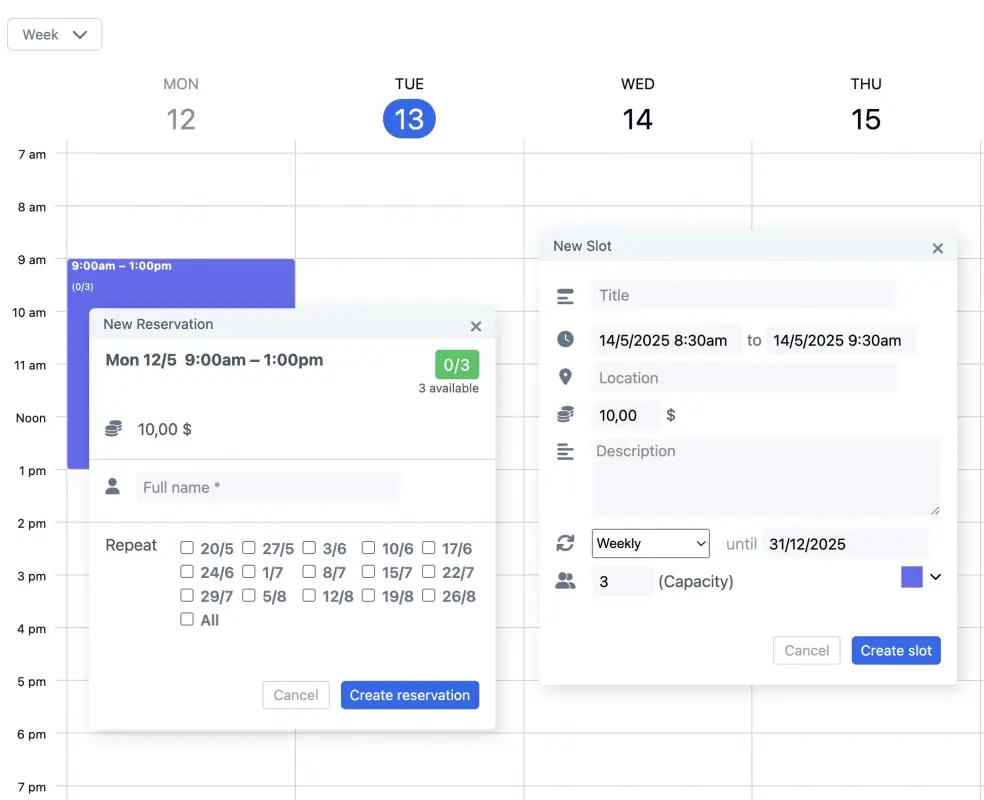
If you allow users to make repeated reservations, they don’t have to create each reservation separately. On a Capacity schedule, this also allows you to create a series of slots all at once. Please note that repeating reservations are only available for Capacity and Resource schedules
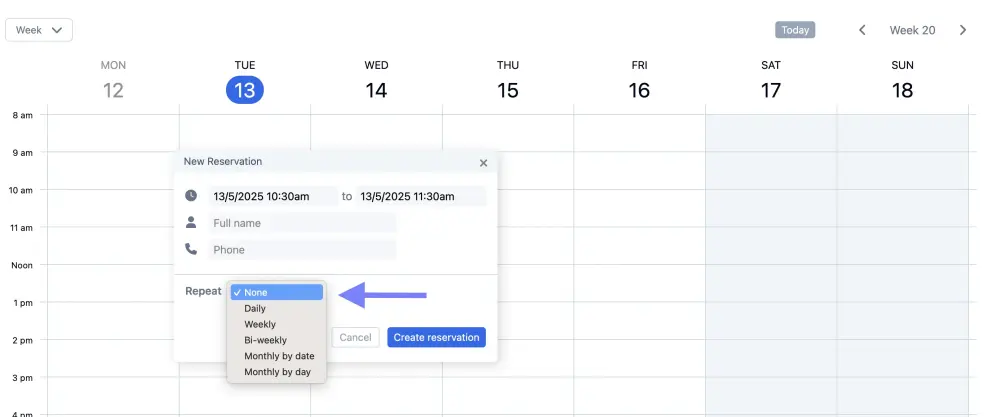
- Via Configure, click on the Process tab. Select the option “Add a repeat option to the dialog box for new reservations” and save the changes.
- Go to your schedule (via Use) and create a new booking. You will now be presented with the option to repeat the booking daily, weekly, bi-weekly and monthly by day of the week or by date.
- If you work with a Capacity schedule, you will be presented with the same option when you create a new slot on the schedule. If you repeat a slot, the system considers it a series of slots. On the Process tab of a Capacity schedule, you will find an additional option that requires users to sign up for a whole series of slots, rather than picking slots individually.
Note that the system does not allow you to repeat slots and bookings more than 52 times. This is to prevent users from creating an endless series of bookings, which could cause you to exceed the appointment limit of your package. It also prevents you from having to delete a whole series of slots one by one, in the event that bookings are made in error.
To repeat bookings more than 52 times, users can simply edit their last booking in the series and begin to repeat it again. To repeat slots as an administrator, go to the last slot in the series, click on “Edit slot”, and you will be presented with the option to repeat the series again.

Using a supervisor field to store additional information
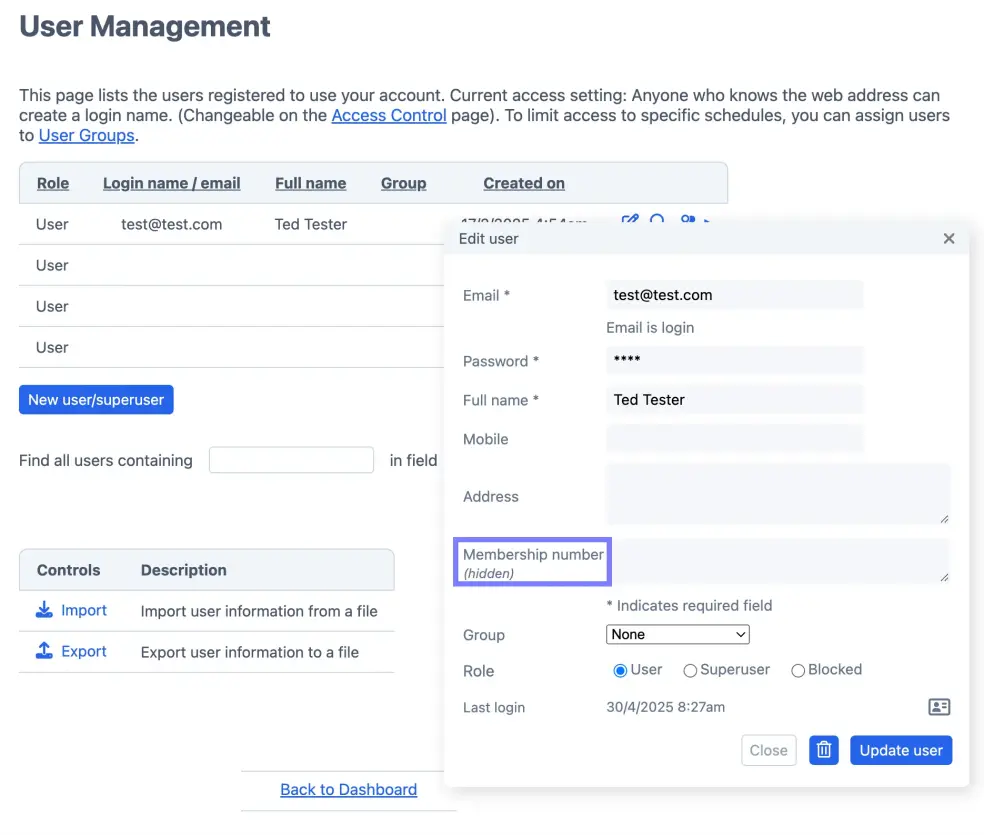
A supervisor field can be used to store additional information about users, such as their membership number or the number of times they have missed an appointment. The supervisor field can be either visible or non-visible to registered and non-registered users.
- You can enable the supervisor field via the Access Control page on the right-hand side your dashboard. Name the field, select if it should be hidden or visible and save the changes.
- The field will now appear in the user details of each user, located on the User Management page on the right-hand side of your dashboard and will be visible on reservations from registered users.
You can also use this supervisor field to offer a discount to an individual customer. For instance, if you enter “−10%” in the Supervisor field, a 10% discount will automatically be applied on the customer’s checkout screen for payments made through the site.

Using URL extensions to enable several hidden options
In addition to the options on the Layout tab, there are a few “URL parameters” that can be used to force the schedule to default to a particular view. For instance, instead of showing the default view, you can use these options to show a pop-up window for a new reservation by default or to zoom directly to a specific date.
| Parameter | Effect |
|---|---|
year=x, month=x, | Move to year, month, week, or day with number x. Can also be combined, for example: https://supersaas.com/schedule/Christmas?day=25&month=12. If you omit the year or the day, it will default to the current year or current day. |
today=true | Move to today, can be useful if the initial date is automatically shifted due to another setting. |
view=x | Force the view to x, where x is one of “month”, “week”, “day”, “free” or “agenda” (Note: the user must be allowed to use that view which can be set via Layout). |
view=widget | As a special case of the previous option this will show a page with the widget format of the schedule. |
view=new | Present the new appointment dialog as a web page, which is useful to “deep link” (directly send a user) to, for example, the sign-up page for a particular class. |
lang=x | Force the language to x, where x is an ISO standard language code or a country code. |
per_page=x | In views with a list this changes the number of visible items from its default value of 10. |
per_slot=x | On a Capacity schedule, this controls the number of items that show up in a pop-up. |
refresh=x | Check for changes on the server every x seconds and refresh the screen if needed. Please choose an interval of at least 5 minutes (x≥300). |
dir=v, dir=h | On the month view, you can force the drawing to appear as either a vertical or horizontal landscape. |
name=x, password=x | Can be used on the login screen to prefill a name and/or password. |
color=x | Shows the slots of that particular color on a Capacity schedule (blue is 0, red is 1, etc.) by default. |
per_page=20 | Increases the number of lines shown in the popup for a slot on a Capacity schedule. |
d.supersaas.com | Using d.supersaas.com to link to the schedule instead of www.supersaas.com forces the system to show the desktop version on mobile devices and tables. |
m.supersaas.com | Using m.supersaas.com to link to the schedule instead of www.supersaas.com forces the system to show the mobile version on desktops. |
In order to use any of these parameters, you first add a question mark (?) to the end of your schedule’s URL*, followed by the parameter and associated value. In case you want to use multiple parameters at once, you can string them together with an ampersand (&) between each pair of parameters.
Example with single parameter:

			https://www.supersaas.com/schedule/your_name/your_schedule?month=10


			Example with multiple parameters:

			https://www.supersaas.com/schedule/your_name/your_schedule?year=2025&month=10&lang=de
Inserting auto-text to customize email confirmations and display messages automatically
Email messages can be customized using the auto-text function. Auto-text strings are a set of words that are automatically replaced by something else when the message is generated. Auto-text can be added via the Layout tab, under Configure.
The standard confirmation email can be adjusted by using the auto-text “$if created”. There are a number of automatically-generated messages available that can be adjusted using the following: “changed”, “deleted”, “approved”, “refunded”, “placed_on_the_waiting_list”, “changed_on_the_waiting_list”, “removed_from_the_waiting_list” or “placed” (“placed” means the user was transferred from the waiting list to having a confirmed appointment).
Using “$replace” will enable you to customize all texts. In this case, you will have to define the content for all confirmation messages by using $if statements.
Here are some auto-text elements that are commonly used for email messages:
| The word… | …will be replaced with |
|---|---|
$name | The name of the person to whom the mail is addressed, if available |
$dear | Writes out “Dear $name,” unless $name is not known |
$subject | The rest of this line will be used as the subject line of the email, and may contain other auto-text elements |
$action | Describes what action triggered the email. For example: “Your booking was $action” translates to “Your booking was created” |
$details | Includes detailed information about the booking, such as time and location |
$replace | Removes all the system-generated text, so only your text will be used |
$modurl | A link that contains a token which allows modification of this reservation without logging in |
$ical | The booking will be attached to the notification as an iCalendar file |
$form | If a form is connected to this object it will be attached as an HTML file |
A complete overview of all auto-text options is available in the layout tutorial.
Auto-text strings for display messages
Dynamic messages can also be used in display messages, such as the one above the schedule, the help screen and the login screen. You can add auto-text for display messages via Configure under the Layout tab.
Here are some auto-text elements that are commonly used for display messages:
| The word… | …will be replaced with |
|---|---|
$name | Writes out the full name of the person currently logged in, if available |
$credit | Writes out the amount of credit for the person currently logged in |
$shop | Creates a link to your shop, for example you could write: “Please buy credits in the $shop before booking” |
$agenda | Creates a link to a page that shows appointments across all schedules in the account, only works when logged in as a user |
$if can also be used to display messages only under certain, predetermined circumstances.
It is possible to display messages depending on the language the user has selected. The condition after the word “$if” can be a two digit language code such as EN (for English) or DE (for German). For example:
		$if EN {Good morning $login}

		$if DE {Guten Morgen $login}
An $if statement can also be used to display different messages depending on whether the visitor has signed in or not. For example:
$if out {Please sign in first or create an account if you don't have one}

		$if user {Welcome back $login!}
A full overview of $if statements can be found in the layout tutorial. Additionally, our email hacks blog explains the process of customizing messages using auto-text.
Connecting to other websites using Zapier or Make
Your SuperSaaS account can be integrated with a wide range of other websites using Zapier or Make. These online services enable you to automatically trigger an action on another app or website when something happens on your SuperSaaS appointment schedule.
Popular applications include:
- Add new users to a MailChimp mailing list
- Connect your schedule to an online project management tool such as ProjectManager.com
- Create a new invoice in Stripe when a new appointment is created
- Create a spreadsheet row on Google Docs for each appointment to build custom logic
- Send a push notification to an iPhone or Android device using Pushover.net to get around the limitations and cost of SMS
- See more examples on the Zapier or Make sites
Because Zapier/Make allow you to filter the triggers you can create highly customized processes. For example, you could send a message to management to approve a booking only if this is a new user and the value is over $100. This way you can implement logic that is specific to your business.
Creating either a Zapier or Make account is free and they both include an unlimited free tier for small users, just like SuperSaaS.
Sending an email to every user registered in a class
If you are using a Capacity schedule in which multiple users can register for a class, you might want to send them all the same email. You could set up webhooks as outlined above, or you can send an email from your own mail program by following the steps below
- Go to Supervise and click on the magnifying glass next to the time slot. This will give you an overview of everyone who has registered in that specific time slot.
- Click on the link “Email all in this slot” to open a page with two lists of email addresses. One list will contain all users who have registered to the class, the other will contain any users that may have signed up for the waiting list.
- Select all email addresses and copy them into your mail program. We recommend that you use the BCC option if you do not want your users to see the email addresses of others.


